When we went on our trip the fam gave me a bunch of stuff
to take down to Florida to give to my sister.
Since we fly stand-by we almost never check bags.
We have had many days of lost bags because we ended up taking a different flight.
It's really best that we keep all of our belongings with us.
My carry-on was full of my own stuff, and so was everyone else's carry-on.
So, I needed an extra bag.
I had a few gross reusable grocery bags that I could have used, but they aren't cute.

I want cute accessories while at the airport, what if I see someone famous?
If Gwen Stefani happens to walk by me I don't want her to think to herself
"Look at that lady with the gross bag."
I want her to think,
"Look at that cute bag! I wonder where she got it?
Maybe I should go and give her concert tickets and she will tell me."
Hey.... It could happen.
So here is how I make a bag.
This is a pretty easy project.
I would say you need about medium sewing skills, it should take you less then an hour.


This is pre-quilted fabric that I picked up from Jo-annes, they have a great selection.
You will need about 26 inches of your main fabric.
1/2 yard of contrast fabric. 60" wide. Get more if you get 45" fabric.
Plastic yarn canvas - it's the stuff that grandma's make tissue boxes out of,
I cant explain it better then that. The link goes to hobby lobby but they have it at Jo-annes too.
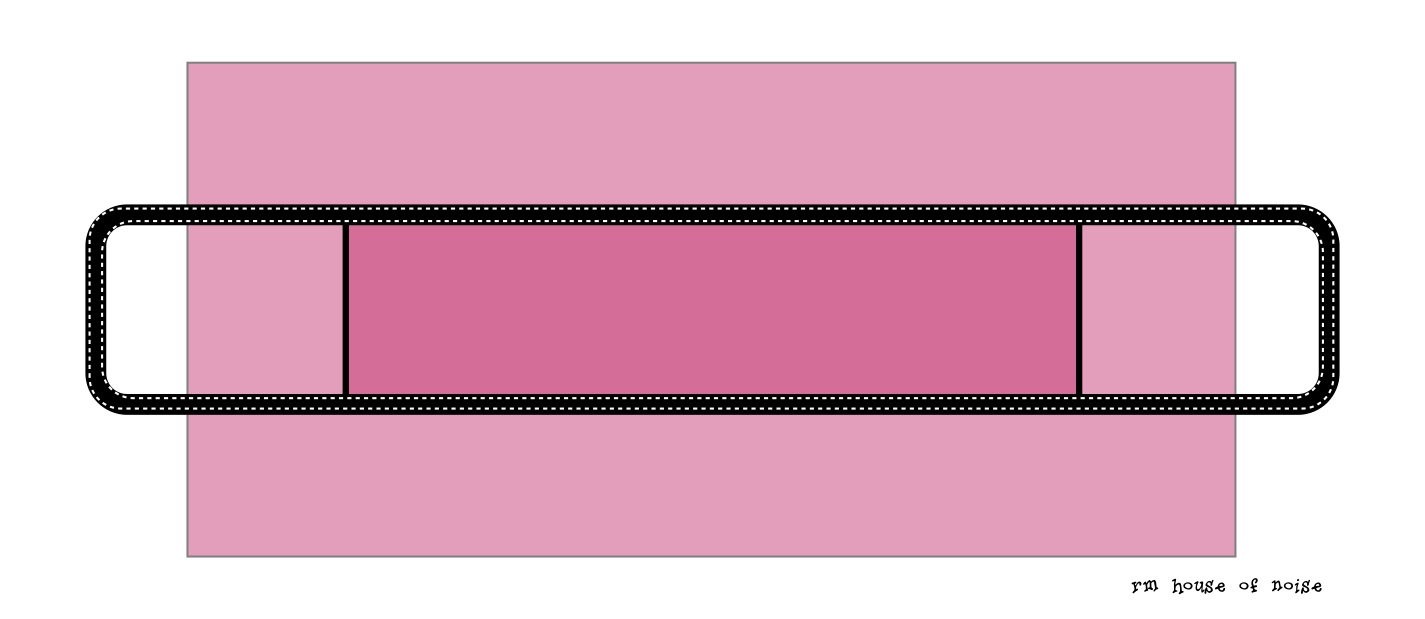
1. Main fabric:
Cut 2 - 20 inch squares, or cut 1- 20x40 inch rectangle.
I had to cut 2 20 inch squares because of the way the stripes in my fabric ran.
If you cut 2 squares sew them together at this time.
Cut a 6 x 32 inch strip for the pocket. The pocket is optional.
2. Contrasting fabric:
Cut 2 - 3 1/2 inch by 60 inch strips for the handles.
Cut 1 - 5 1/2 x 20 inch strip for the bottom.
Cut 2 - 1 1/2 x 8 inch strips for the contrast on the pocket
3. Sew the thin contrast strip to both ends of the pocket fabric strip. Trim excess.
Or just fold the top over and hem if you don't want the contrast.
4 & 5. Get your iron hot. With the strips for the handles fold each side over about 1/4 of an inch and iron it down. And then fold it in half hiding the raw edges inside. Iron.
6. Pin your pocket and handles in place. Place the pocket in the center if the fabric that will form the body of the bag. The handles will be pinned along the sides of the pocket covering the edges of the pocket about 1/2 inch holding it in place. The handles should meet in the middle, which will become the bottom of the bag. We will cover this up so it wont show.
* I should have taken better pics here sorry, but in picture 6, fold down the top of the bag to allow for hemming and pin the handles in place. You will hem the top of the bag last, but the handles and hem need to be correctly placed at this step. You can see this better in picture 8. Fold it once about 1/2 inch down and then fold it again about and inch down to give you a clean folded edge.
I hope this picture illustrates the placement and where to sew a little better.
Sew the handles on. It should just be one big loop, with the raw edges of the handles meeting in the middle. Sew as close as you can to the inside of the loop and then sew the outside of the loop.

7. Fold the sides of the bottom contrast fabric in 1/2 inch and iron. Place in the center of the
bag and sew down both of the long sides. Do not sew the short sides.
8. Fold the bag in half RSF (right sides facing) so it is inside-out, and sew down one side of the bag.
9. You will be able to see where the bottom strip is and on the inside of bag hem the corner by sewing a line straight across, making a triangle shaped corner, This will form the bottom of the bag.
10. I wanted a nice crisp, steady bottom to the bag so I cut to size the plastic yarn canvas and inserted it in the bottom. Slip it right inside the little pocket you just created with the contrasting fabric. You can skip this step if you want, it does make sewing the other side and creating the other bottom corner a pain. But I like how it turned out and how it gives definition to the bottom.
10 1/2. At this point repeat step 8 and 9 on the other side of the bag. If you inserted the plastic in the bottom you will have to bend and maneuver a little, but it's pretty flexible so just bend and squish it as much as you need to.
11. Clip the corners.
12. I did a zig-zag stitch on all of the raw seams inside the bag, to finish it off, keep it from raveling and give the seams extra strength.
13. Fold, pin, iron and hem the top of the bag. I like to fold it once about 1/2 inch down and then fold it again about and inch down to give you a clean folded edge.

Email me if you have any questions.
rmhouseofnoise@gmail.com
Sometimes I'm not sure if I'm typing in english or not, especially at 11:00 at night.
So I hope this all makes sense.
Thanks!

1 comment:
Wow! I loved the fabric,very beautiful.
I'm your follower and love your blog. I'm hosting valentine giveaway. please take time to visit my blog and leave comment.
http://www.daffysdream.blogspot.in/2012/02/valentine-days-giveaway.html
Post a Comment